Wednesday, December 8, 2010

ZBrush R3.5: Creating Normal Maps

Creating normal maps are similar to Polypaint. Make sure your mesh is already UVW unwrapped before exporting as an .OBJ file.


Start by clicking on New Texture.


Bring your mesh up to High Res in order to paint good quality normal maps.


Proceed to ZBrush details into your mesh.


Once done, dial the mesh back down to lowest resolution.


Go to Normal Map and play around with different combinations of Tangent, Adaptive and SmoothUV and click on Create NormalMap.


Once happy, click on CloneNM to bring the map over to the left hand side. Remember to rotate the texture before exporting. Done!

ZBrush R3.5: PolyPainting

PolyPainting in ZBrush R3.5 is very different from R3. It is supposed to be easier but I found out the hard way that it is frustratingly different, not necessarily easier.

Here are the steps:

Make sure you already have a 3D mesh modelled, fully UV Unwrapped and exported as .OBJ format. Import this mesh in ZBrush.


Under Texture Map, click New Texture.


Then click New From Polypaint and you should be getting this upside down UVW Map of your mesh.


As you only want to affect colours and not the mesh itself, remember to turn off ZAdd. The next step is VERY IMPORTANT. Immediately start painting. You will not see anything. Don't worry.


Toggle the texture off and you will see the results of your earlier painting. If you missed the earlier steps and start painting after turning the texture off, the painting looks screwed up.


Click New from Polypaint to register the new changes and click Texture On to see the changes.


Bring your cursor to the UV thumbnail and you can see the details painted.


When you are ready to export the painted map, click on Clone Texture.


The painted map should be transferred to the left side.


Go to Texture and Rotate the painted texture.


Click on the left hand side image and Export. Done!

Wednesday, September 15, 2010

Machinima: Making Custom Character Animation Part 3


Open up Unreal Editor and in the Generic Browser, right click in the grey area and create a New AnimSet.


Double click on the (empty) AnimSet and the AnimSet Editor dialogue box will open up. Load up the Krall character.


Go to File and load up the .PSA file of the KungFu animation.


At first, the Krall will do a KungFu on the spot. Be sure to uncheck bAnimRotationOnly.


Look for the Cinematic Krall mesh under CH_Krall_Cine, click on that Krall and add it to the scene.


Fire up Kismet and create Matinee.


Double click on Matinee, right click on the grey area of the Matinee dialogue box, and Add New Skeletal Mesh Group and give it a name that makes sense eg. KrallAnim.


When you click on the root of KrallAnim, you will find the GroupAnimSets is currently empty. Pick that animation from the Generic Browser and assign it to the GroupAnimSets.


Click on the Anim bar, hit the Enter key to assign an animation (here it is Kick).


It should be like this. Adjust the timeline and run the animation in realtime to see it in action. Done!

Tuesday, September 14, 2010

Machinima: Making Custom Character Animation Part 2


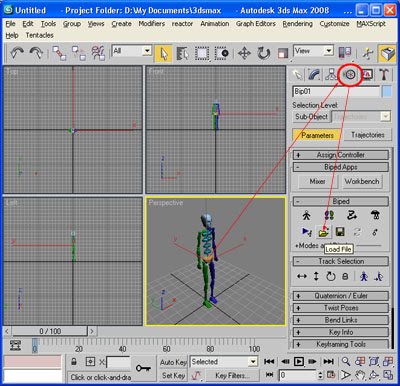
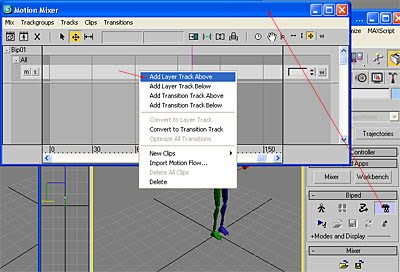
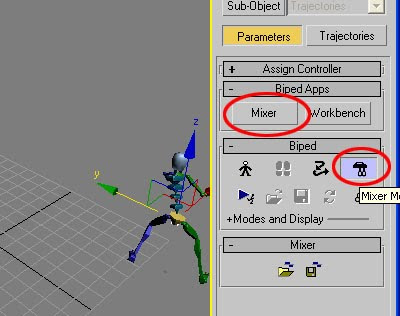
Click on the Motion Mixer icon to open up the Mixer dialogue box. Right click on the dialogue box to add another layer. You will need two layers if you have two motion capture clips.


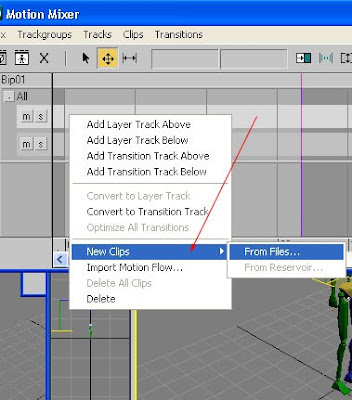
Right click to insert a motion capture clip as in the diagram.


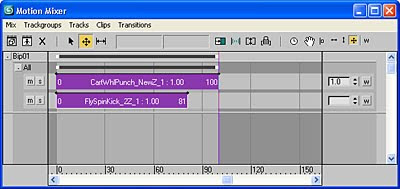
At first, your dialogue box should look roughly like this. You will need to align the clip so that the correct animation plays at the correct timeline.


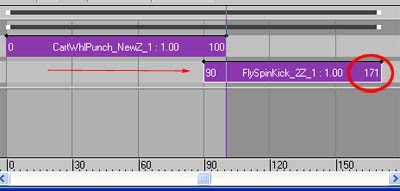
Drag the second clip as per your liking.


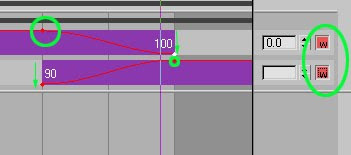
Next, click on the "w" button to invoke weightage to your mocap clips. Then add points to the timeline clips so you can drag the weight percentage of the clips between 0% to 100% (somewhat like Adobe Premiere).


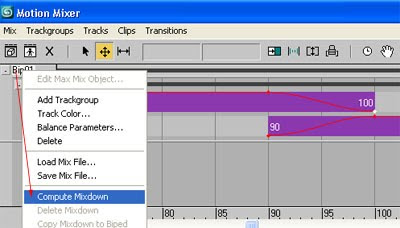
Once happy, click on the word "Bip01", right click and "Compute Mixdown".


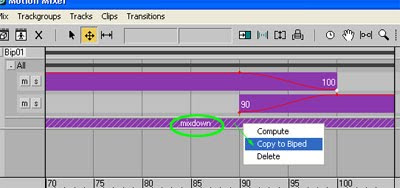
Once the mixdown is computed, it still is not committed to the biped. This is evident when you close the Mixer icon and you will find that nothing has changed. So to commit the change, right click on the mixdown, and Copy to Biped.


Close the mixer dialogue box and see the final results.


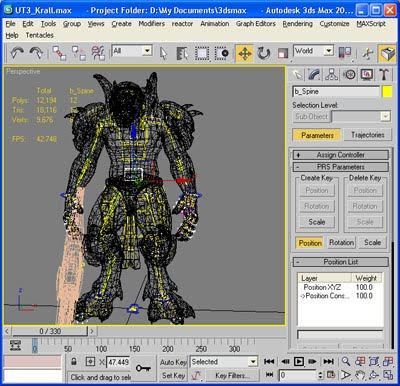
Open up the Krall model which you can download from UDN.


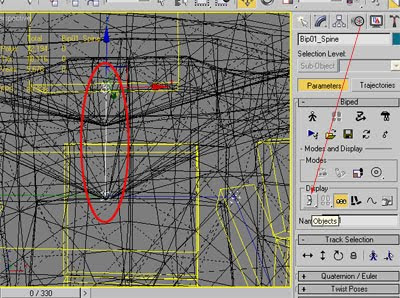
At first, you may not be able to see the Character Studio bone (of which you wouldn't be able to incorporate your custom mocap). So zoom in to the Krall, you will notice a very thin line. Click on that line and change the view mode to "Object".


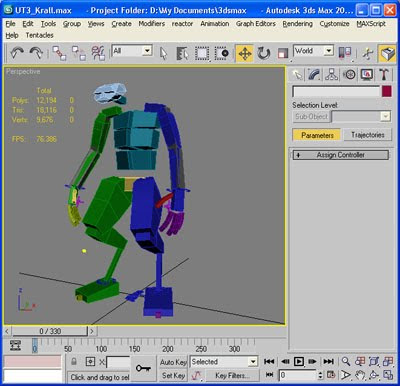
You Krall structure would look like this.


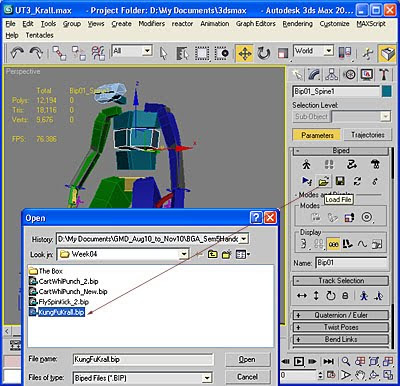
Click on a bone in the Character Studio, go to the Motion tab, and open the customised mocap file.


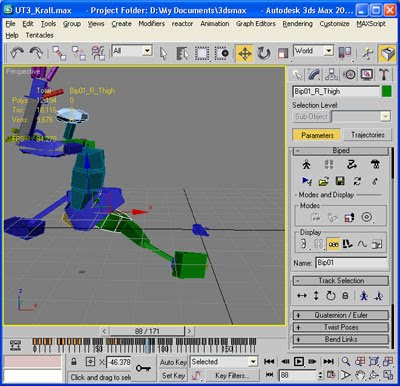
You Krall will now be doing a KungFu action! Remember to export the animation to .PSA format using the ActorX plugin.

In Part 3, we will go into Unreal Editor itself to incorporate that custom animation.

Monday, August 23, 2010

Machinima: Making Custom Character Animation Part 1

This tutorial will help you make custom animation for existing characters in Unreal, in order to make them do certain animations that do not exist in the AnimSet within Unreal. In my example, I will make a Krall character do some kung fu fighting by using some motion capture files and incorporating it in Character Studio, then exporting it to Unreal.


First, get yourself some motion capture files (or keyframe some animations). Open up Character Studio like in the diagram.


Remember that Character Studio is a max plugin and in most respects, it is pretty much a different software altogether. Thus, some of the workflow is very different from max. Click on any body part of the Biped character, then click on the Motion tab. This will open up the Biped parameters. You can then access the Open folder icon to open up the motion capture files of your choice.


Examine your mocap files. The last frame of the first file and the first frame of the second file should have the same centre point for the character. This way, the transition animation between the two files will be seamless and smooth. If it is not, the move the centre point so that they align. You can observe the centre point by clicking on the Footsteps icon.


Expand upon the Layers menu. Create Layer and select Bip01 and move it to the centre point. Remember to turn on the Auto Key button to record the animation.


You will see a red silhoutte. That is the position of the original animation as opposed to the new position of your animation.


Click on the Collapse layer button to flatten your layer and commit all the new keyframes onto the old keyframes.


In order to blend the two animation clips together, you need to save the readjusted animation clips. Click on the icon and save accordingly.

In Part 2, we will learn how to use Motion Mixer inside Character Studio to mix the two (or more) animation clips together so they blend seamlessly.