Monday, April 20, 2009

Kismet: Blinking Lights

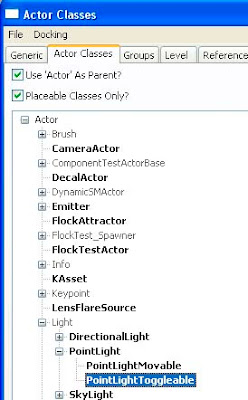
To create blinking lights, you will need PointLightsToggleable under the Generic Browser-> Actor Classes


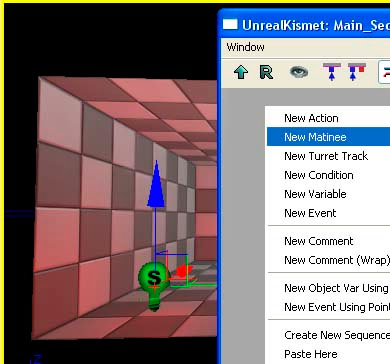
With the ToggleableLights selected, open up Kismet, right click and create a new Matinee sequence.


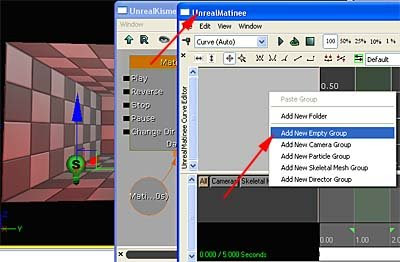
Double click on Matinee in Kismet to open up the Matinee Keyframe dialogue box. Right click on the dark grey area and "Add New Empty Group". Give it a meaningful name like "Animated Lights" for example.


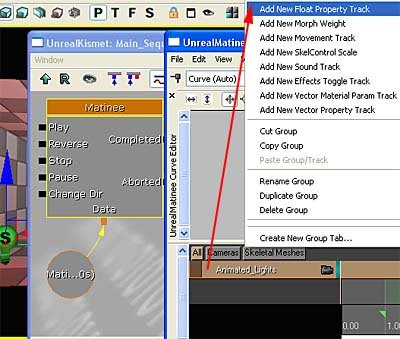
Click on the Animated_Lights track and right click to "Add New Float Property Track".


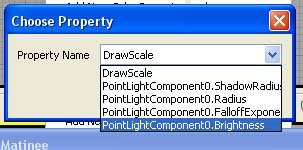
If your Toggleable Lights had been selected all along, you should be able to select Brightness for your PointLightComponent.


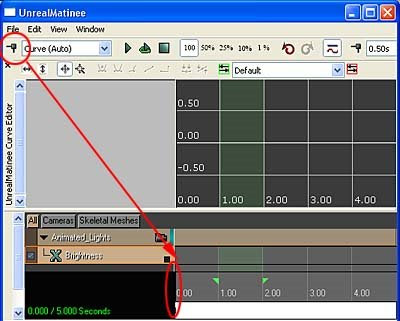
Add Key for your starting frame.


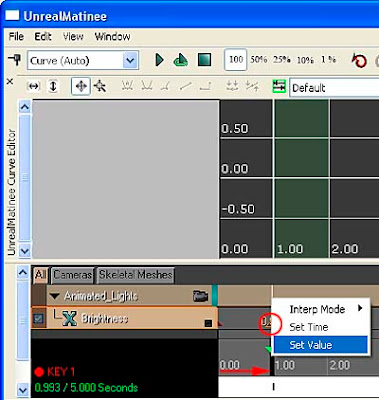
Scrub the black bar to the next keyframe and Add Key again. Right click on that red triangle and you should be able to Set Value (zero if you want no light intensity).


Repeat process till satisfied.

Kismet: Movable Platforms

Because movable platforms are so common in Unreal, the editor has a shortcut to create them without the hassle of enabling Triggers and hooking things up in Kismet.

Select a Static Mesh but add it as an InterpActor (very important)


The InterpActor will be pitch black. If you cannot see the mesh, press "W" on the keyboard. Double click on the mesh to access its properties. Under DynamicSMActor->Light Environment -> LightEnvironmentComponent, enable it.


The result is from dark to visible:


Select the mesh, open up Kismet, right click on an empty area and select "New Event Using InterpActor" -> "Mover"


Double click on Matinee, notice the tracks have been created for you. Add a key for the starting point and ending point.


Do the necessary movements.


Run the level and you are able to trigger the platform to move. HOWEVER, there is one problem.... the platform does not detect collision with your character and you are not elevated with the platform (which is the whole point of elevators, right?). So double click on the InterpActor to access it properties. Go to Collision and choose COLLIDE_BlockAll. There! Instant elevators.

Kismet: Animating with Matinee

This is a general way of animating using Matinee. Some functions like movable platforms, have shortcuts to get it working so this chapter can be skipped altogether. The reason for this chapter is because we may have specific needs to do certain animations, and thus knowing the steps to get things animated is important. Many things can be animated: Movement, Rotation, Colour, Intensity, Effects and even Sound.

Select a Static Mesh, right click on the floor and either add InterpActor or Mover (as I understand it, they can be used interchangeably).


With the InterpActor/Mover still selected, open up Kismet and create a new Matinee.


Double click on Matinee to get into keyframing mode for Matinee.


In the dark grey area, right click and "Add New Empty Group". Give it a name like Test Anim.


Select the Test_Anim track and right click on it. A wide variety of animation choices becomes availalbe. If we want to animate movement, then select "Add New Movement Track".


You should end up with this:


With the InterpActor at starting point (red arrow), click on the "Add Key" button (circled red) and it should add a keyframe at time zero (pointed by red arrow). Scrub the black bar to the next keyframe area (yellow arrow) and click on "Add Key" again. Move the InterpActor to it next destination.


Done! With this basic knowledge, you should be able to animate in Matinee with some logical thinking in place.

Kismet: Enabling Triggers

A trigger is something that will set off another event. Creating it in Unreal is simple enough. First, create a simple level with a point light.


We want another light that can be on an off upon stepping on a trigger. Under Generic Browser, go to Actor Classes tab and expand your Light till you get PointLightToggleable.


Select the floor and right click to "Add PointLightToggleable Here"


Change the lights to another colour (double click to access its properties) so we can differentiate between the PointLight and the PointLightToggleable.


Add a Trigger by Right Clicking.


The Trigger looks like this and is invisible by default.


For testing purposes, we want to be able to see the Trigger icon. Double click on the Trigger icon to open up its properties. Disable Hidden.


Create a Trigger event in Kismet. 1. Select the Trigger, 2. Open up Kismet, 3. Right click on Kismet and choose New Event Using Trigger -> Touch


You want this trigger to have a Toggle function, so right click on Kismet and add New Action -> Toggle -> Toggle


You want your Toggleable Light to be hooked up with the Trigger and Toggle functions. So, click on the Toggleable Light, right click on Kismet and add New Object Var Using PointLightToggleable_1.


Do the hooking up as per diagram. Remember to select Trigger Touch function (denoted by yellow) and under Max Trigger Count, change to 0 (This will make it infinitely toggleable).


Build All the level and you should be able to toggle the red lights on and off by walking into the Trigger.

Introduction to Kismet

Kismet is what I call a "Visual Scripting" software in a sense one can "program" a series of events by simply drag and dropping events in a flowchart. If something needs to be animated, it can be further articulated in Matinee.

Kismet is activated by clicking on the funny "K" button.


What it cannot do
Kismet is good for modifying existing parameters that already exist in Unreal. However, once you wish to add functionality or parameters that do not exist in Unreal, you will have to turn to UnrealScripting to do that (which is out of my league for now). Examples would be to change the way the Camera works or Adding a new kind of weapon complete with totally different abilities from that found in Unreal.

Getting Started
I think the best way to learn Kismet is to create something in mind rather than learn what each and every function is about (which definately put me to sleep). So let's begin!

Monday, April 6, 2009

Setting up a Custom Character

This is one area that is not covered in Jason Buzzby's video tutorials. Surprising because I would think that many modders would be interested to mod not just a level but to create characters of their own and populate it in their Unreal levels. I will attempt to offer a very simple a straight-to-the-point guide as other online tutorials do a good job explaining things in detail.

Note that you need to create your characters to match the proportions given in these templates. If you do not do so, then you either 1. have to make your own set of animations OR 2. using the ready animation sets, you will get weird distortions in your meshes.

Character Templates
There are 4 basic rigs/meshes to use:
1. Human Male
2. Human Female
3. Krall
4. Corrupt

Opening up the Male, you get this IronGuard character.


Essential Body Parts
Typically, your character should also be in parts:
Head
Torso
Shoulder Pads
Arms
Thighs
Boots

NOTE: All the parts do not have "holes". So fill up the gaps between the polygons.


Note also, that Characer Studio is used for animation but the real rig is the one in yellow. Why? Coz Character Studio has some nice "auto balancing" features (and more) that makes the animation more natural. It is then "baked" into yellow rig.


When you skin, skin to the yellow rig, not Character Studio's Biped.


You will also notice the IronGuard file comes with additional LOD (Level of Detail) meshes. You can do that if you are looking to optimize your game. Let's skip that for now.

In case you do not see Character Studio's Biped, it means it is hidden. Just click on the grey thigh area, select Motion and enable/disable biped's viewability.


UVW Allocations
All your characters need to be UVW Unwrapped and placed in the correct slots.


Exporting and Importing Mesh
You will need to install the ActorX plugin to 3dsmax in order to export it to Unreal.

You can access ActorX from the Utilities Tab.


Make sure you do not get errors when exporting. These settings work for me.


First, export the skin file (PSK). Select the mesh components for export and click "Save Mesh/Refpose".


In UT3 Editor, in the Generic Browser, Import the PSK.


Then, create a package to store your custom character.


From the Generic Browser, go to your package and double click on the MaleTest. You should be able to see the character.


You should import the two UVW Maps Head/Mask areas and Body Parts areas. Create a Material to assign to your custom character. We skip this step as there are already some ready made materials for the IronGuard Male.


Select the relevant Material Balls and assign it to the Mesh (by clicking the green arrow). Here 0 is for the Head area and 1 is for the Body parts.


Exporting and Importing Animation
To export animation, look to the lower part of ActorX.

For a quick and dirty test (assuming you want very specific animations and not reuse the standard UT3 animation sets), I exported a Kick...

and a Bow...


Notice that the main animation file (.PSA) is called MaleTestAnimation. The Animation Sequence Name is called Kick. Click "Digest Animation". Proceed to the Bow animation. Don't worry. The Kick info is kept in memory.

Once you have all the animations "digested", click on "Animation Manager".


Move it to Output and Save it as a PSA file. Open UT3 Editor. In the Generic Browser, click on an empty area and create an AnimSet.


and Import the PSA file.


Under the Anim tab, you should be able to select "MaleTestAnimation" and playback both the exported animations.


Adding the Custom Character and watch him Move!
Select the Custom Character, click on the level floor and Add the SkeletalMesh Actor.

Next, double click the custom character, go into SkeletalMeshComponent and click on the "+" sign for AnimSets. Select your AnimSets from the Generic Browser and assign it by clicking the green arrow.


If you want your custom character to be kicking when you play the level, do this:


Compile the level, and play. The character appears to be unlit. I am not sure if this is the correct way, but this seems to work:


Congrats! Your custom character is alive and "kick"ing ...hahaha