Tuesday, October 27, 2009
Custom Weapon in UnReal: Part 2
In UnReal Editor, import the textures for the weapon, the weapon mesh (.PSK) and the weapon anims (.PSA).
Create an AnimSet
Your AnimSet Editor will open. Choose the weapon mesh and import the .PSA from here.
Open the Socket Manager and assign MF to the base and MuzzleFlashSocket to the point of fire.
This is how you import .PSA in case anyone is clueless.
In your UTAmmo_SmileyGun.uc, change the highlighted sentence to UTWeap_NameOfYourWeapon.
UPDATE: Here's a more detail breakdown of what to change (be sure to save as ANSI format if using NotePad++)
Open UTAmmo_SmileyGun.uc
Change line 4 to this
class UTAmmo_SmileyGun extends UTAmmoPickupFactory;
line 9 to this:
TargetWeapon=class'UTWeap_SmileyGun'
these redefine the name of the class and retarget the ammo to the correct weapon. If you like you can play with line 8.
AmmoAmount=8
Open UTAttachment_SmileyGun.uc
change line 4 to:
class UTAttachment_SmileyGun extends UTWeaponAttachment;
line 24:
End = Start + vector(Instigator.Controller.Rotation) class'UTWeap_SmileyGun'.default.WeaponRange;
line 117:
SkeletalMesh=SkeletalMesh'WP_Smiley_Gun.Mesh.WP_Smiley_Gun_3P' (or wherever your mesh is located)
line 131:
WeaponClass=class'UTWeap_SmileyGun'
Now open UTWeap_SmileyGun.uc
change line 4:
class UTWeap_SmileyGun extends UTWeapon;
change line 345 and 346:
SkeletalMesh=SkeletalMesh'WP_Smiley_Gun.Mesh.WP_Smiley_Gun_1P' (or wherever the first person gun is located)
AnimSets(0)=AnimSet'WP_Smiley_Gun.Anim.WP_Smiley_Gun_1P_Anim'
line 352:
AttachmentClass=class'UTAttachment_SmileyGun'
line 355:
SkeletalMesh=SkeletalMesh'WP_Smiley_Gun.Mesh.WP_Smiley_Gun_3P'
line 400:
MuzzleFlashSocket=MuzzleFlashSocket
DONE!
In your UTAttachment_SmileyGun.uc, make the changes as per this pic.
The third uc file is the toughest. Basically, examine the file and change what you think links previously to the rocket launcher, to now link to the SmileyGun. I've attached the hacked UTWeap_SmileyGun.uc file for your perusal.
When you run the UnReal editor again (once the uc files are hacked), it will detect changes and act as a compiler. This message will appear.
There should be no errors. Then you're good to go.
Run Unreal and go to Mutators.
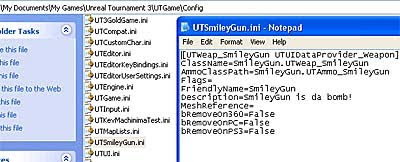
Close Unreal and a UTSmileyGun.ini should be created. You can change FriendlyName and Description.
Back in Unreal, go to Mutators -> Weapon Replacement
Forgot to mention that a .u file would also be created. Put that into the Published directory if you are to run Unreal instead of the Editor.
Done!
Note: Do not name your package the same name as your weapon script folder (eg. SmileyGun folder, do NOT have a SmileyGun.upk. Unreal is too stupid to figure this out.
Custom Weapon in UnReal: Part 1
This tutorial is slightly tougher than Custom Characters as it involves hacking into scripts and compiling it (some pretty scary stuff for artists). So you've decided you want to mod a weapon. This tute is will only show you how to change the "skin" of the weapon and to have some customised animations. If you are looking for a very customised weapon with very specific projectile behaviour and weapon damage, this could be a starting point but definately not comprehensive enough.
First, decide what weapon you want to replace its skin with. Here, I chose the RocketLauncher because that's the weapon that comes with the IronGuard mesh.
Note that there is a first person(1P) and a third person(3P) version of the guns; the 3P version being lower in poly count.
Go into UnReal Editor and open up the package that contains the gun you wish to mod. Examine it right down to the Socket Manager (observe how many sockets and the name(s)) as well as the way the weapon parts are linked.
To keep things simple, I will be using just the 3P version to be implemented in the 1P and 3P weapons. Notice the MuzzleFlashSocket is only one in this case.
Go to UDN UT3ModHome to download the script source files.
The scripts required are these ones. Copy these files and place them into your UTGame/Src/NameOfYourWeapon/Classes. Rename the files to your WeaponName. Here, I copied and changed it to SmileyGun.
In your Config directory, look for the UTEditor.ini and add a modpackage called NameofYourGun. Note that this corresponds with the UTGame/Src/SmileyGun directory that you created.
Open up your weapon in max. Note the green "pyramids". Those will act as your bones once you skin the weapon. YES. You need to skin the weapon like you skin the character but eveything's rigid in this case. I will do another tutorial on how to skin the gun if anyone is interested. Please request for it if so.
The selected "pyramid" is the root bone of the weapon. When I exported it, it wasn't spinning centrally so my guess was to...
Move the gun away from the grid center before exporting in ActorX. Not sure it that did the trick coz I'm writing this tute based on memory as I screencaptured these pics quite awhile ago.
Do a series of animations and export it out in ActorX.
Refer to this text file to see if you can make any sense out of what I wrote.
In Part 2, we will examine how weapons are configured within UnReal Editor.
FaceFX in UnReal: Part 3
Create a simple level, add Marcus static mesh, camera and lights.
Create a Matinee for Marcus and add a FaceFX track.
Assign the AnimSet to this FaceFX track.
When you click on keyframe, you can now add the Animset to the track.
Add your Camera(s) and DirGroup etc.
Your Kismet should look something like this (just in case you are having trouble figuring it out).
Done! One floating Marcus head talking in realtime... Freaky....
FaceFX in UnReal: Part 2
Open up UnReal Editor and import the sound and Marcus static mesh you exported in Max earlier. You should have a 16bit wav sound file ready for this exercise. Turn on bAutoCreateCue. You need a SoundCue file to work with FaceFX Studio.
Select on the Marcus static mesh, right click and Create New FaceFX Asset.
Import your .fxa file into this FaceFX Asset.
You are now ready to work with FaceFX Studio.
Go into Animation Manager and...
Create Animation... just be sure to...
Select your SoundCue before proceeding in the Animation Manager.
Click Next for the next few screens. My SoundCue says "Hello Baby" so this is what I typed in...
Select the animation you created and go to Curve Manager.
On the left are the suggested facial expressions you may need. On the right are the custom facial expressions I exported from Max.
I will only be needing one curve, in this case, I chose "Blink". So remove the other curves as you won't be requiring it.
Move your custom curves from the right, over to the left.
You should get something like this.
Click on the Animation Tab. Notice the blue bottom are where I defined "Hello Baby" earlier. Scrub through it and arrange your phonemes where you think they ought to be.
Click on "Blink" and notice it has a curve. If you click on the other custom phonemes and attempt to create curves on it, you can't (or at least I don't know how). If you click on say "H", copy and the click on the upper right (grey) curve area and paste, NOTHING HAPPENS. I was stumped for awhile here. Maybe it's a bug, who knows? Here's how I went around this...
Rightclick on "Blink". Go to Curve Properties and uncheck "Owned by Analysis".
Notice the icon of "Blink" changes and your curves are selectable now.
Marquee select the Blink curve and Ctrl+C (Copy). Then switch over to "H" channel, click on the curve area and Ctrl+P (Paste). You will have an instant curve but this time, if you Preview the animation, Marcus will have a "H" mouth shape at that timeframe. Shift the curve, adjust according to your needs.
Keep doing this until your character is talking according to speech.
In order to use this in Matinee, you need a FaceFX Animset.
With the Animset done, access FaceFX Studio once more.
Go to your Animation Manager and move your animation to the Animset.
Notice your Animset is no longer empty.
Phew! The hardest part is finally over! In Part 3, we will put everything into Matinee and that's where the real fun begins!
Subscribe to:
Posts (Atom)